Total Hip Replacement – Corail/Pinnacle

Trays and Software

Trays:

  • Total Hip Tray
  • Stryker 6/7/8
  • Pinnacle Acetabular Cup
  • Pinnacle Quickset Graters
  • Corail Femoral Tray

Software:

  • Hip pack
  • Crepe
  • Big ioban
  • Shark
  • Saw blade (per surgeon’s preference)
  • 2 ethibond
  • 1 vicryl x 2
  • 2 polysorb
  • 3 monocryl
  • Skin glue
  • Mepilex
  • Standby:
    • Jelonet

Total Hip Replacement – Trident/Exeter

Trays and Softwares

Trays:

  • Total Hip Tray
  • Stryker 6/7/8
  • Trident Acetabular Cups
  • Trident Acetabular Graters
  • Exeter Femoral Basic Instruments
  • Exeter Femoral Rasps
  • Plug Trials
  • Cement Gun
  • Standby:
    • Screw Sets
    • Head Impactor/Pusher

Software:

  • Hip pack
  • Crepe
  • Big ioban
  • Shark
  • Saw blade (size is per surgeon’s preference)
  • Femoral canal brush (or tip, as per surgeon’s preference)
  • Suction catheter
  • Ribbon gauze
  • Pulse lavage
  • 1L PNSS
  • Optivac cement 80
  • 2 ethibond
  • 1 vicryl x 2
  • 2 polysorb
  • 3 monocryl
  • Skin glue
  • Mepilex
  • Standby:
    • Redivac drain
    • Jelonet

Long Femoral Nail (TFNA)

What is a Long Femoral Nail?

Long femoral nail is a hip fracture fixation using an IM nail, a lag screw or blade, and locking screws.

Trays and Softwares

Trays

  • Major Orthopaedics Tray
  • Stryker 6/7/8
  • Opening Tray
  • Distal Locking Tray
  • Synreams

Softwares

  • DHS/Nail Pack
  • Small ioban
  • 4.2 short drill
  • 3.2 guide pin (have an extra one on standby)
  • 2.5 x 950mm synream rod
  • 1 vicryl
  • 2 polysorb
  • 3 monocryl
  • Skin glue
  • Mepilex
  • Standby:
    • Reduction forceps (heygroves)

Scrub Technique

  1. Fracture reduction using traction table.
  2. Skin preparation and draping.
    • Small ioban
    • Vertical drape
  3. Entry pin.
  4. Entry reamer.
  5. Synream rod.
  6. Nail length measure.
  7. Femoral preparation using synreams.
  8. Nail insertion.
  9. Lag screw/blade insertion.
    • Guide pin
    • Measure
    • Ream.
    • Lag screw/blade insertion.
  10. Distal locking screws.
    • Drill, measure, and locking screws.
  11. Skin closure and dressing.

Short Femoral Nail (TFNA)

What is Short Femoral Nail?

Short femoral nail is a hip fracture fixation using an IM nail, a lag screw or blade, and locking screws.

Trays and Softwares

Trays

  • Major Orthopaedics Tray
  • Stryker 6/7/8
  • Opening Tray
  • Distal Locking Tray

Softwares

  • DHS/Nail Pack
  • Small ioban
  • 4.2 long dril
  • 3.2 guide pin (have an extra one on standby)
  • 1 vicryl
  • 2 polysorb
  • 3 monocryl
  • Skin glue
  • Mepilex

Scrub Technique

  1. Fracture reduction using traction table.
  2. Skin preparation and draping.
    • Small ioban
    • Vertical drape
  3. Entry pin.
  4. Entry reamer.
  5. Nail insertion.
  6. Lag screw/blade insertion.
    • Guide pin
    • Measure
    • Ream.
    • Lag screw/blade insertion.
  7. Distal locking screws.
    • Drill, measure, and locking screws.
  8. Skin closure and dressing.

Dynamic Hip Screw

The procedure.

The Dynamic Hip Screw is a surgical hip fixation procedure using a lag screw, a plate, and screws (4.5 cortex screws).

Trays and softwares.

Trays.

  • DHS instruments tray
  • Major orthopaedic tray
  • Stryker 6/7/8

Softwares.

  • DHS pack
  • Small ioban
  • 3.2 x 145 drill
  • 2.5 guide pin (another 1 on standby)
  • 1 Vicryl 9465
  • 2 Vicryl
  • 3 Monocryl
  • 1L PNSS
  • Skin glue
  • 15 or 20 Mepilex
  • Optional:
    • Extra norfolk and norwich

Scrub technique.

  1. Closed reduction using a traction table.
  2. Skin preparation and draping.
    • Small ioban.
    • Vertical drape.
  3. Skin incision and fracture site preparation. You will need your retractors and maybe bone elevators. Also, they may do open reduction.
  4. Entry guide pin. You will need your wire driver and pin guide.
    • They may also need an extra guide pin to make the fracture site more stable.
  5. Measure.
  6. Entry reamer.
  7. Lag screw insertion.
    • Some surgeons may opt to use a tap screw first before inserting the lag screw.
  8. Plate application.
  9. Screw fixation.
  10. Wash with saline.
  11. Final x-rays and skin closure.

Cannulated Hip Screw

The Procedure

The procedure is done using a traction table. If you have scrubbed for a DHS before, then you will follow the same set up.

Trays and Softwares

Trays.

  • 6.5/7.3 Cannulated screw tray
  • Major Ortho tray
  • Stryker 6/7/8

Softwares.

  • 2.8 threaded guide pin x 3
  • Small ioban
  • DHS pack
  • 1 vicryl
  • 2 polysorb
  • 3 monocryl
  • Skin glue
  • 1L PNSS
  • Mepilex

Scrub Technique

  1. Closed reduction using traction table.
  2. Skin preparation and draping.
    • Small ioban.
    • Vertical drape.
  3. Skin incision and fracture site preparation. You will need your retractors and maybe bone elevators.
  4. 1st guide pin. You will need you pin guide from the set.
  5. 2nd guide pin.
  6. 3rd guide pin. (Some surgeon’s may put the first cannulated screw first, so always ask for your surgeon’s preference.)
  7. Measure.
  8. Cannulate drill (found in the set)
  9. Cannulated screw insertion.
  10. Wash with PNSS.
  11. Final x-rays and skin closure.

Hips

Anatomy of the Hips

Anatomy of the Hip Joints

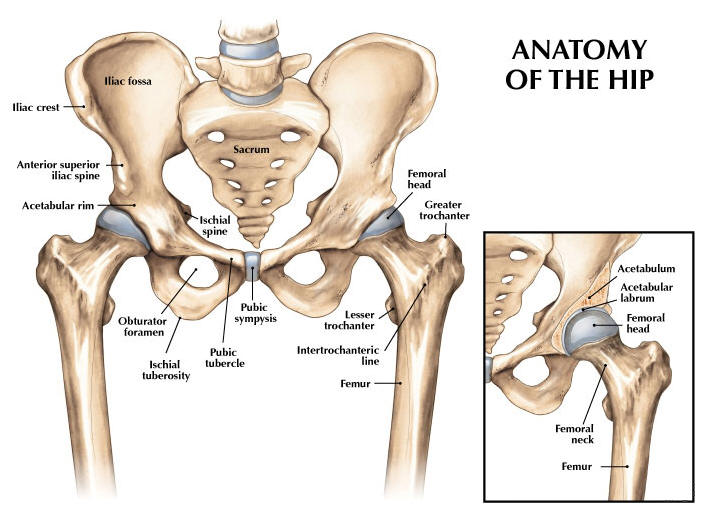
The hip joint is composed of two main bone parts: the Acetabulum and the Femur.

Acetabulum is the concave part of the pelvis where the femoral head is attached into.

Types of Fractures

Hip fractures are classified as either intracapsular or extracapsular fracture. By the word itself, intracapsular fractures occur at the part of the femur which is attached to the acetabulum. While extracapsular fractures are those found outside of that capsule and below.

To give you a more clear picture of the distinction, make an imaginary line from the tip of the greater trochanter to the tip of the lesser trochanter. The fractures that occur above of that line are your intracapsular fracture. And the one that occurs below are your extracapsular fractures.

Surgical Procedures

These are the common procedures that is done to fix a hip fracture.

Gloves Size

ConsultantsUnderOverNotes
Mr RG8.58Uses a special under gloves.
Mr HT8.58Loves to use green gloves.
Mr HW8.58
Mr MD8.58.5
Mr JFB7.57.5
Mr OKB8.58
Mr ABM
Mr CB8.58
Mr SP87.5
Mr Gan7.57.5
Mr GS88
Mr AA8.58.5
Mr AS8.58
Mr Hos88Likes to use op-tapes.
Mr BR87.5
Ms Champ76.5
RegistrarUnderOverNotes
Mr Chiang7.57
Ms Kapoor76.5
Ms Seewoonarain77
Mr Cameron8.58.5
Mr Derias
Ms Scott7.57
Ms Ishani6.56
Mr Qulaghassi7.57
Mr Hewage7.57.5
Mr Apostolides8.58
Mr Shehadeh87.5
SCPUnderOverNotes
John88
A. White8.58
Norman8.58.5
Sandy76.5
A. Ashbey87.5
Ewa7.57.5
Sam6.56.5
StaffUnderOverNotes
Carly6.56.5
Niki6.56.5
Mark87.5
Lucy6.56.5
Christine6.56.5
Perbin6.56.5
Fred6.56.5
Terry8.58.5
Netsai76.5
Troy87.5
Rovin87.5
Lisa76.5
Dolly65.5
Monica76.5
Alisa76.5
Jo7.57

Hip Hemiarthroplasty

What is Hip Hemiarthroplasty?

Hip hemiarthroplasty is a surgical procedure done to fix an intracapsular fracture of the hip. It involves removing the femoral head and neck. Then, put a combination of prosthetics which includes a head, a neck, and a cemented stem.

Instruments and software that you may need during the procedure.

Trays.

  • Hip hemiarthroplasty tray
  • Stryker 6/7/8
  • Plug trials
  • Femoral rasps
  • Femoral basic instruments
  • Unipolar instruments

Softwares.

  • Hip pack
  • Crepe (optional)
  • Big ioban
  • Shark
  • Pulse lavage
  • 1L PNSS
  • Saw blade (Please check surgeon’s preference; some likes wide blade, while others like the narrow one.)
  • Femoral brush (Mr OKB like femoral tip instead of the brush)
  • Suction catheter (f10 or f14)
  • Ribbon gauze
  • Optivac cement 80
  • 1 vicryl (9465) x 2
  • 2 polysorb
  • 3 monocryl
  • Skin glue
  • Mepilex dressing

The procedure in a glance.

The procedure is done the following order (but may change as per circumstances or surgeon’s preference):

  1. Skin preparation and draping.
    • Ground sheet.
    • U drape.
    • Foot drape.
    • Leggings.
    • Crepe (This is per surgeon’s preference. Some doesn’t use crepe.)
    • Hip drape.
    • Top drape.
    • Small ioban – may assist the surgeons by holding the leg.
    • Big ioban.
    • Set up your light handles, diathermy, suction, and pulse lavage.
  2. Skin incision and fracture site preparation.
    • You may need the following instruments: scalpel, mayo scissors, norfolk and norwich, langenbecks, spikes, hohmann’s, charnley retractor, bristow.
  3. Removal of the femur head.
    • Saw blade, nibbler, osteotome, mallet, cork screw, head measure, and have a skid handy.
    • Have a small ready for the acetabulum.
    • Some surgeons like to trial the head using unipolar trial heads on a handle.
    • Determine head size.
  4. Femoral preparation.
    • Box chisel and mallet
    • Femoral reamers, starting from the smallest.
    • Plug sizer
    • Femoral rasps/sizer and handle; and have a t-handled charnley spoon ready.
    • Once they have determined the femoral stem size, they may trial it with a langenbeck and/or trial head.
    • When they are happy, they will install the cement plug and will prep the femur using the following: femoral brush (or tip for Mr OKB), suction catheter, and ribbon gauze (some surgeons will use the smallest plug sizer to introduce the ribbon gauze into the femoral cavity).
  5. Cement and prosthesis.
    • Change gloves.
    • Always ask the surgeon if they’re happy for you to mix cement. It is also crucial to inform your runner and the anesthetic team that you will be cementing soon.
    • Mix the cement:
      • Mix for 30 seconds
      • Install nozzle and attach into the cement gun
      • Ideally, the surgeons will start introducing the cement 2 minutes after mixing.
    • Prosthesis:
      • Stem
        • Have the stem introducer ready (some surgeon would only use a mayo scissor to introduce the stem)
        • Gillies and mcdonald’s handy on the working table.
        • Ideally, will let the cement settle for 10 minutes.
    • Neck
      • Trial neck attached to a head trial.
      • Once they are happy, they will install the neck using the impactor and mallet.
    • Head
      • Impactor and mallet.
  6. Skin closure.
    • 1 vicryl x 2
    • 2 vicryl
    • 3 monocryl
    • skin glue
    • mepilex
    • Always make sure that you have checked the diathermy site and overall skin quality of the patient after the procedure; most important, sign out.